An essential step in the creation of videos is color grading. It brings out the beauty, surroundings, and tone of your work. A useful tool for color grading is a 3D Look Table (LUT). 3D LUTs modify the brightness and color of a picture using a mathematical formula. The instructions on the 3D cube will change the colors in your video.
Using a 3D LUT opens up creative options and ensures stability throughout your video. You can save time and effort by understanding 3D LUTs and achieving a consistent appearance and feel. This hidden component can give a magical touch to your work and elevate your video to new heights.
In this article, we will give you a complete guide to color grading and how to use 3D LUTs.
Part 1: What Are 3D LUTs and How Are 3D LUTs Used
A 3D LUT is a file that has a set of instructions for adjusting an image's brightness and color. A 3D LUT (Lookup Table) achieves exactly that. With the help of this strong tool, you are capable of controlling the color grading process by applying a set of instructions that modify the brightness and color of your video.
The technique of color grading takes your footage from average to outstanding. It's the technique of intensifying color to create a certain tone, feel, or aesthetic. And that's where LUTs come in; they're the secret tool that lets you create a distinct look for your project or a consistent appearance throughout some clips.
How Are 3D LUTs Used
In video production, 3D LUTs are applied in a variety of ways to improve and style footage. Below are some of the use cases:
- Color Grading: 3D LUTs are used for color grading in video editing tools. You can easily improve your video with 3D LUT.
- Style and Look: To create a certain style or aesthetic, like a movie's dark or old appearance, you can use 3D LUTs.
- Mood and Atmosphere: 3D LUTs can be used to modify the color scheme to create a certain mood or atmosphere.
- Experimentation with Creativity: You can try out different 3D LUTs to discover a range of creative possibilities and achieve the ideal look.
- Collaboration: To make sure that everyone agrees, you can easily share LUTs with clients or other team members.
3D LUTs are now used in video editing software like Wondershare Filmora. It allows you to experiment and select quickly the ideal look for your production.
Part 2: Strength and Limitations of 3D LUTs
It's a fact that color grading can be a difficult process. However, it can now easily be done with the 3D LUTs. It has some pros and cons, which we will be discussing below.
Strengths
Here are a few advantages of utilizing them:
- Saves Time: Time-saving 3D LUTs are a huge asset. They apply a uniform color grade to multiple clips, saving you hours of laborious manual adjustment of each one.
- Consistency: Maintaining consistency is essential. With the use of 3D LUTs, your footage will appear consistent even if it was recorded with many camera lighting conditions used to record it. It appears to have a constructed design guide with it!
- Activates Your Creativity: 3D LUTs allow you to play around with various aesthetics and styles to get the ideal look for your project. In the mood for a movie? Completed! What about a retro feel? Simple as pie!
Limitations
Even with the many pros, it also has some downsides. 3D LUTs aren't perfect, and there are some limitations to consider.
- Inflexibility: 3D LUTs cannot function properly if your footage has varied lighting or camera settings. They might not adjust to changes and be overly inflexible.
- Avoid Using Them Too Much: Take care while using 3D LUTs! They could give your video a repetitive, uniform appearance. To make it interesting, change things up and incorporate your flair.
- Utilize Them Sensibly: Understanding 3D LUTs' advantages and disadvantages will improve your utilization of them. Utilize them to provide a professional style to your footage, but don't forget to inject some of your creativity!
Part 3: Using 3D LUTs with Wondershare Filmora
You're in luck if you're trying to improve your footage. Adding a professional look to your videos is simple with Wondershare Filmora. A fantastic video editing tool that supports 3D LUTs can indeed be somewhat difficult.

However, Filmora makes it easy. You can change the footage's appearance and achieve the desired effect with a few clicks. Spend no more time learning difficult software or methods—Filmora has you covered.
By using the LUT files that Filmora provides, you can try out different looks and determine which one suits your video the best. Finding the ideal look for your movie is made easier with Filmora's user-friendly interface, which allows you to easily switch between several LUTs and view the changes in real-time.
Features of Filmora 3D LUTs
Now, there are many features that you can use in Filmora. However, we will discuss some of the key features of Filmora 3D LUTs.
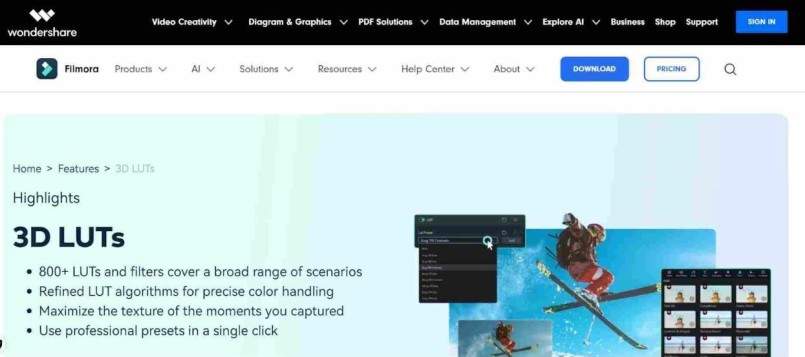
- Multiple Adjustment Filters: Filmora offers 100 new 3D LUTs (color filters) and works well with different types of videos, like travel, gaming, and more.
- Tools for Creating LUTs: You can import your favorite 3D LUTs to match your project better, giving you more creative control to achieve unique color effects.
- Optimized Cache and Feedback: Filmora helps you manage cache files more efficiently and use feedback channels effectively.
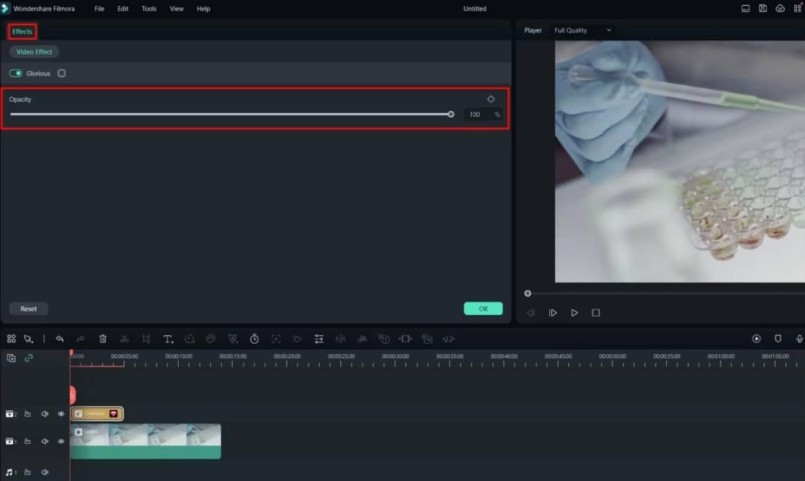
- Customizable Interface and LUT Intensity: You can adjust the interface and set the LUT intensity from 0 to 100%, customizing your video exactly how you want.
How to Use 3D LUTs with Filmora?
Unlock the full potential of your videos by learning how to use 3D LUTs with Filmora. Here are some steps to use 3D LUTs with Filmora.
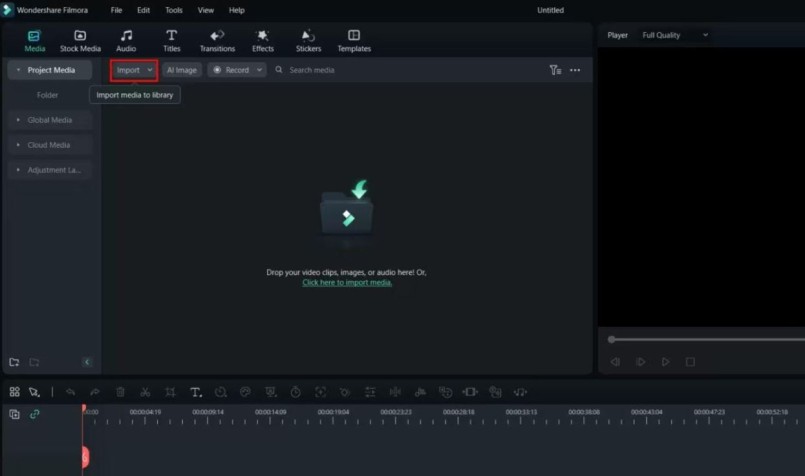
Step 1: Add Your Videos
Click "Import" and choose the files you wish to work with to import your video clips into Filmora.

Step 2: Utilize the 3D LUTs
Browse through Filmora's collection of 3D LUTs by selecting the "Color" tab. To watch the magic, select the one that best suits your preferred style and click "Apply."

Step 3: Adjust the Style
Adjust the intensity, contrast, and saturation to customize the settings. Here's where you may add your flair and personalize the 3D LUT.

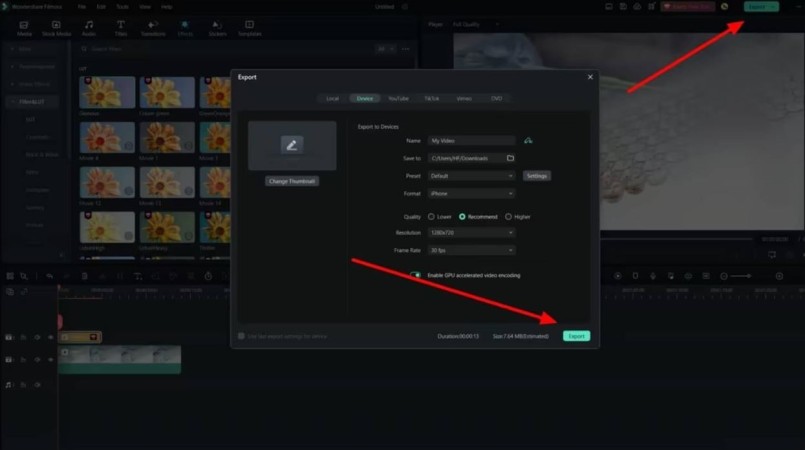
Step 4: Export Your Magnificent Work
After you're satisfied with how it looks, render your video using the 3D LUT by clicking "Export."

Conclusion
Now that you have this thorough guide in your hands, you can fully utilize 3D LUTs and advance your color grading abilities. Never forget that practice makes perfect, so don't be scared to try different looks to see what works best for your videos.
Experiment with various LUTs, adjust the parameters, and determine which one looks best in your videos. With Wondershare Filmora, producing gorgeous, polished content will come easily. 3D LUTs are a game-changer for editors of all experience levels. So go ahead, use your imagination, and elevate your videos.


